Thursday, October 15, 2009

MySQL Nested Cursor Declaration Issue

Unlikes the Oracle PL/SQL which you can declare the CURSORs in the beginning of the program then execute the SELECT statement anywhere in the code body, MySQL needs to declare the CURSORs in the beginning of the program and applys the SELECT statement right behind the declaration. If you try to declare a Cursor in the middle of the codes, you will get -

You have an error in your sql syntax, check the manual that corresponds to your Mysql server version for right syntax to use .....

To avoid the problem, you can either issue a FUNCTION to handle the inside nested cursor statements or issue a nested BLOCK to declare the Cursor -
CREATE PROCEDURE FIND_ITEM()
BLOCK1: BEGIN
DECLARE done INT DEFAULT 0;

DECLARE XINVNO TEXT;

DECLARE cur CURSOR FOR
SELECT INVNO FROM TMP_SN5 WHERE TOT1=0 AND ITEMS='';
DECLARE CONTINUE HANDLER FOR NOT FOUND SET done=1;

OPEN cur;
p_loop:LOOP
FETCH cur INTO XINVNO;
IF done=1 THEN
LEAVE p_loop;
END IF;

BLOCK2: BEGIN
DECLARE DIS_ITEM TEXT;
DECLARE XQTY INT;
DECLARE XITEM TEXT;
DECLARE done1 INT DEFAULT 0;
DECLARE cur2 CURSOR FOR
SELECT ITEM, QTYSHP FROM ARTRAN01 WHERE TRIM(INVNO)=TRIM(XINVNO);
DECLARE CONTINUE HANDLER FOR NOT FOUND SET done1=1;
OPEN cur2;
SET DIS_ITEM='';
k_loop:LOOP
FETCH cur2 INTO XITEM, XQTY;
IF done1=1 THEN
LEAVE k_loop;
END IF;
SET DIS_ITEM = CONCAT(DIS_ITEM,  XITEM, ' (' , CONVERT(XQTY, CHAR), ') ') ; 
END LOOP k_loop;

CLOSE cur2;

IF DIS_ITEM<>'' THEN
UPDATE TMP_SN5 SET ITEMS=DIS_ITEM WHERE TRIM(INVNO)=TRIM(XINVNO);
END IF;
END BLOCK2;

END LOOP p_loop;
CLOSE cur;

END BLOCK1;

Saturday, September 26, 2009

Set Up Lotus Domino 8.02 Partitioned Servers on Amazon EC2 - Part III

Once all notes.ini files have been updated, you need to restart the server to find out if -
1. the Windows services have been raised automatically ?
2. the attached volume is assigned to correct drive letter ?
3. each partitioned server is binding to correct IP and port ?

Instance Health Check -
It is recommended that you should use CloudWatch to monitor the instance's health condition($0.015 per instance-hour), you do not need to enable it all the time, however, try to use it to monitor the system during the high volume data exchange(replications).

I only use the Domino Cloud as the backup purpose, therefore, the replication will be the major loading for these partitioned servers. I had forced them to replicate big amount of data in the same time to watch the system performance. Most of the time the CPU is under 50% usage line -


Create Your Own AMI & snapshot -
To create your own AMI, you will need to bundle the instance first. Make sure you have a directory ready in S3 before you create the bundle task, otherwise, you will get an error at the end of the process. You can create a directory under S3 only for this bundle use, do not delete it unless you do not want to keep the AIM converted by this bundle.

The bucket name for bundle instance is the new directory name you created on S3.
Once the bundle is ready for use, you can register it as your own AMI. Again! This AMI only includes the C drive image, none of the D drive or your attached volume data will be store into!

Create a Snapshot of Volume -
The most important part for us is the datastore(data directories) - F drive. A snapshot of the volume represent a backup at that time. If you want to keep this instance alive, then you can write a script to do the backup automatically.
Amazon also offers different type of instance called Reserved Instance which you can only run it at specified period of time and stop the instance most of the time to save money.


Set Up Lotus Domino 8.02 Partitioned Servers on Amazon EC2 - Part I
Set Up Lotus Domino 8.02 Partitioned Servers on Amazon EC2 - Part II

Friday, September 25, 2009

Set Up Lotus Domino 8.02 Partitioned Servers on Amazon EC2 - Part II


Some Recommend Tools Beside AWS Management Console -
Firefox 3 or higher - to run add-ons like Elasticfox, S3Fox
Elasticfox - EC2 management tool
S3Fox S3 Organizer - S3 management
Ultra VNC Server - remote access through web browser

Once the instance launched, it takes about 10 - 15 minutes to be ready for first use. Follow the instructions to get the administrator password, then you have to use the MS Remote Desktop Connection to make your first contact -
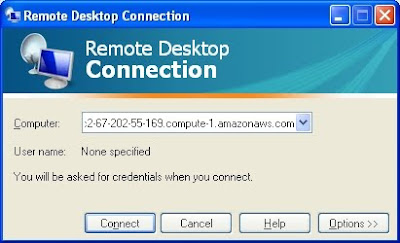
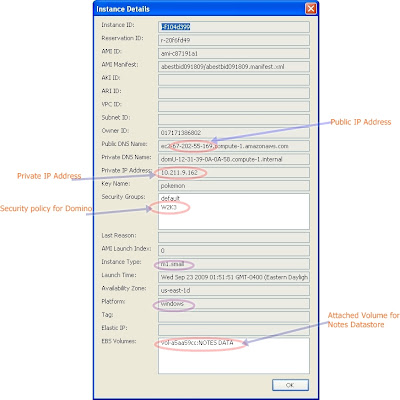
the computer name field uses the "Public DNS" name of this instance. However, this is a fixed IP address, the address can be tell by the number after "ec2-". You can use this as the public IP address of this instance, as long as you do not attach an elastic IP, the address won't change till you terminate this instance.

You can use the MS Remote Desktop as the remote login client, however, a VNC-based remote control is recommended since you can use the web browser to do all the jobs. Especially, you might not be able to see the Domino console when using MS Remote Desktop. If MS RDC is your only choice, then you will need to use the Domino remote set up to install the Domino servers.

Install VNC Server
Launch IE, Download Ultra VNC latest version and install the VNC server, make sure you set the VNC password and check the "Enable JavaViewer (Http Connect). Make it as a Windows Service when pop-out windows ask so.
To access the instance through web browser, you just need to point URL to http://your instance public address:5800

S3 Utilities
The S3 account is necessary not only to store our own AMIs and snapshots, but to exchange programs and data between our network and EC2. The Domino server installation file can be uploaded to S3 then download from the instance machine. S3 Organizer add-on on Firefox is the tool we use -
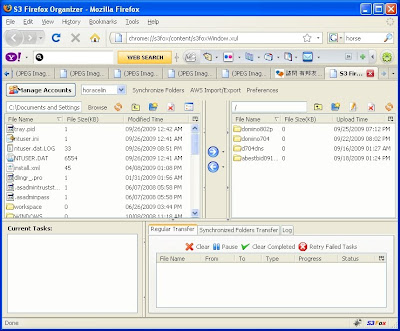
New EBS Volume for Notes Datastore
Since we would like to keep the machine image even after instance terminated, we will need to attach a EBS volume for the data directory. The Disk Management program's "change drive letter" function is not working under EC2 Windows running instance, therefore, an utility program - ec2config need to be installed to make sure the volume we attach has correct drive letter we need (I used "F" as the data drive letter).

After the data drive has been created from the attached volume, create the necessary directories for each partitioned server, download the necessary Domino server installation file(mine is 8.02) and those partitioned server IDs from S3. Start the installation to install the program file at C:\Lotus\Domino and set correct partitioned server directories.

Once the installation finished, if you use VNC then you can click at the Domino server shortcut icon to start the setup process for each partitioned server, otherwise, you will need to use remote setup to complete the partitioned server setup which can be done by opening MS-DOS prompt, go to C:\Lotus\Domino directory then type
nserver "F:\partition server dir\notes.ini" -listen
then use one of the running Notes server run follwoing command -
nserver -remote
For detail Remote Domino server setup click here.


Currently, Amazon only offers one public IP for each instance, therefore, you can only enable following services for one of the servers - POP3, SMTP, IMAP, HTTP, HTTPS, LDAP. You still can have multiple HTTP services for these servers, however, you need to use different port numbers instead of port 80.

Modify notes.ini file on partitioned servers
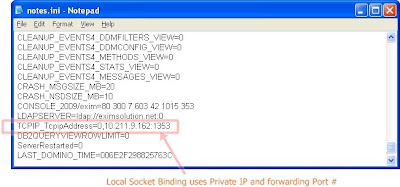
After finishing all partitioned server setups, you need to modify the note.ini file to make sure they are binding to the correct IPs and ports. The one IP limit also forces you to use port mapping method to host multiple partitioned servers. Click here for detail port mapping setting. Again, each instance has one private IP and one public IP, you will need to use both IPs to configure the correct notes.ini file. Use the private IP to bind the socket when server start up, use the public IP for port mapping.

The notes.ini TCPIP setting on Port Mapping server (the 1st partitioned server)
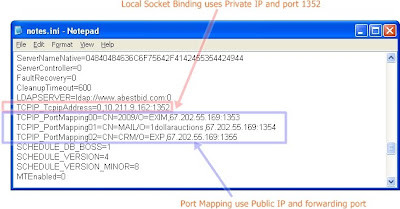
notes.ini IP setting on other partitioned servers


Set Up Lotus Domino 8.02 Partitioned Servers on Amazon EC2 - Part I
Set Up Lotus Domino 8.02 Partitioned Servers on Amazon EC2 - Part III

Thursday, September 24, 2009

Set Up Lotus Domino 8.02 Partitioned Servers on Amazon EC2 - Part I


a snapshot of 4 Domino servers running on 1 Amazon EC2 instance

The purpose of this practice is to find a reliable(over 99.9% up time) and cheap back-up/disaster recovery plan for Lotus Domino systems.

You must have an Amazon account to start your own EC2 and S3 account. Go to Amazon web site, click at "For Developers" at left hand bottom, then click at "Amazon Web Services". Once you get into the Amazon Web Services page, sign up for a free AWS account. Then click at "AWS Management Console" to start your EC2 own journey. Couple hours' digging will only cost you less than $2 (a Windows 2003 instance cost $0.125/hr), so do not afraid to try anything new!

IBM does offer some AMIs on Amazon EC2. However, there is no Lotus Domino pre-installed AMI, therefore, we have to build it from the ground. I will use Windows 2003 server for this practice, I did try the Cent OS 5.3 which was also working fine.

We would like to build four partitioned servers on a single instance, since one instance can only attache one IP, therefor, we will need Port Mapping to share this IP.

What we need -
Basic Microsoft Windows Server 2003 (AMI Id: ami-de4daab7)
100GB EBS Volume for datastore
1 Elastic IP(optional)
Domino Server 8.02


We pick the Small Instance (m1.small) which has
1.7 GB memory
1 EC2 Compute Unit (1 virtual core with 1 EC2 Compute Unit)
160 GB instance storage (150 GB plus 10 GB root partition)
32-bit platform

If you plan to save the image for future use (your own AMI)then don't bother to use the 150GB D drive at all, since the data on D drive won't be saved when creating new image from this instance. Therefore, we need a datastore(a new Volume) created from EBS, I set the size at 100GB according to my case, try not to use the size much bigger than you need because you need to pay for the storage too!

Security Setting -
Before creating your first instance you need to create a new Security Group (mine named W2K3) add some more ports to fit our instance needs


port POP3, IMAP, SMTP, HTTP, HTTPS ports open or not depend on your applications
Port 1352 is the Domino default port
port 1353 - 1356 used by partitioned servers which need port mapping
port 8585 for Domino server remote setup
port 5800/5900 for VNC server
port 3389 for Windows Remote Desktop

You can launch instance now!


Set Up Lotus Domino 8.02 Partitioned Servers on Amazon EC2 - Part II
Set Up Lotus Domino 8.02 Partitioned Servers on Amazon EC2 - Part III

Wednesday, May 27, 2009

Yeah! I Got My Free Google ION !


Since my JetBlue mileage free ticket will soon expire and I am also working on switching some of our Lotus Notes applications to Google App which gave me a very good excuse to fly to San Francisco to attend the Google IO 2009. My only interest here is Google App, didn't have any intention to get involved in the Android developing. However, after Google gave me this Google Ion( HTC Magic) with 30-day free voice and unlimited 3G data, I am thinking about picking up some Android sessions .....

N.....no! Better just post it on ebay to make up some of my traveling expense! :-(

Friday, May 22, 2009

X60 goes internet thru HTC FUZE 3G

Got my AT&T FUZE couple days ago, since I will be on the road very soon, just want to make sure the 3G data network will allow my laptop to access internet by "sharing the internet" function to save some of the hotel internet surcharges. However, after I connected it thru USB with my IBM X60, it kept giving me - "Cannot Connect. The Remote party has ended this connection...." error message!?

After Googleing -

First,need to download the REGEDIT program for the Windows Mobile 6.1, which can be found at
http://www.phm.lu/Products/PocketPC/RegEdit/

pick "PocketPC 2002/2003 (ARM/PXA)

Modify [HKEY_LOCAL_MACHINE\Comm\InternetSharing\settings]
original setting is "AT&T ISP". Change it to "Media NET"

Restart the Windows Mobile, connect to laptop thru USB, choose "Internet sharing" when connection windows pop-out, make sure your 3G data network is ON.

My laptop started surfing the internet thru 3G!!! Tried couple YouTube videos, speed is pretty good, no delay at all!

Thursday, April 30, 2009

How To Pass ASPX Page Control Parameter to Master Page Javascript Function

Microsoft introduced the Master Page concept at .NET 2.0 which supports developing a common look and feel across the entire web site. However, there is no directly way to pass the value from the web pages controls to master page' javascript section. I have tested a simple example for me to do it easily -

The codes below passing the value of FormView control (FormView1) field named "EMAILTextBox" to Label1 at Master page, then the Javascript function pfb() retrieve the value from the Label field - "Label1"


the aspx page -
<%@ Page Language="vb" AutoEventWireup="true" <span style="color: rgb(255, 0, 0);">MasterPageFile="~/MasterPage.Master"</span>
title="JUST A TEST" %>
<span style="color: rgb(255, 0, 0);"><%@ MasterType VirtualPath="~/MasterPage.Master" %></span>

<script runat="server">
Sub Page_Load(ByVal Sender As Object, ByVal e As System.EventArgs)

Dim mtb As Label
Dim tb As TextBox
tb = FormView1.FindControl("EMAILTextBox")
mtb = Master.FindControl("Label1")
mtb.Text = tb.Text

End Sub 
</script>
<asp:content id="Content1" contentplaceholderid="head" runat="server">
<asp:formview id="FormView1" runat="server" datasourceid="SqlDataSource1" defaultmode="Edit">
<edititemtemplate>
LASTNAME:
<asp:textbox id="LASTNAMETextBox" runat="server" text="'<%#">' />


FIRSTNAME:
<asp:textbox id="FIRSTNAMETextBox" runat="server" text="'<%#">' />


OPHONE:
<asp:textbox id="OPHONETextBox" runat="server" text="'<%#">' />


EMAIL:
<asp:textbox id="EMAILTextBox" runat="server" text="'<%#">' />


<asp:linkbutton id="UpdateButton" runat="server" causesvalidation="True" commandname="Update" text="Update">
<asp:linkbutton id="UpdateCancelButton" runat="server" causesvalidation="False" commandname="Cancel" text="Cancel">
</edititemtemplate>
..................... codes ........................
</asp:Content>

master page (MasterPage.Master) -
<%@ Master Language="VB" AutoEventWireup="false"  Inherits="JustATest.MasterPage" %>

<script language="javascript" type="text/javascript">

function pfb(){
var data1;
document.write(<span style="color: rgb(255, 0, 0);">document.getElementById("<%= Label1.ClientID %>").innerText</span>);
}
</script>


.............
<asp:contentplaceholder id="ContentPlaceHolder1" runat="server">

</asp:contentplaceholder>