Friday, December 31, 2010

Cross Domain Issues on CouchDB and Sencha Touch

Two of the best parts of the CouchDB are the REST HTTP API and the JSON-based data structure which makes it an ideal database solution for JavaScript-based Mobile App(WebApp). While trying to use the JavaScript-based framework( likes Sencha Touch) to work with CouchDB, the first issue is always the cross-domain Ajax problem. The solution is to use JSONP, however,  the JSONP can only fulfill the "GET" part, the "POST" part has to be achieved by a "proxy" solution which against the original simplicity philosophy - JavaScript + CouchDB only! If this is a read-only App then we can live with it by using JSONP, if data write back is necessary then we have to figure out a better way! Fortunately, the PhoneGap offers the solution, since the html files under PhoneGap are called by webkit with the file://protocol, the security policy does not apply!

On the previous post - Thanksgiving Weekend Crash Course - Android, Sencha Touch, PhoneGap and CouchDB I used the JSONP(Ext.util.JSONP.request) as the example, since it can be debugged under Chrome(or Firefox) then port to the Android. To test the Ajax function(Ext.Ajax.request) I have changed the codes as following
function makeAjaxRequest() {            
  Ext.Ajax.request({
    url: 'http://127.0.0.1:5984/facebook/_design/acdc/_list/basic/facebook/all',
    method: "GET",
    params: {},
    success: function(res, request) {
               if (res) {
                     result = Ext.util.JSON.decode(res.responseText);
                        arr = [];
                        for (i=0; i< result.rows.length; i++){
                          arr.push({id: result.rows[i].id, img: result.rows[i].img, game:  result.rows[i].game, lastName: result.rows[i].lastName, firstName: result.rows[i].firstName});
                        }
                        layout(arr);                      
                    }
                    else {
                        alert('There was an error retrieving the data.');
                    }
                },
                failure: function(res, request){
                 alert('Failed: ', res.responseText);
                }
            });
        }
      
  Ext.onReady(function() {
    makeAjaxRequest();
  });

and under CouchDB a new "list" named "basic" needs to be created to work with the Ajax call, this "basic" list function will generate a JSON object instead of a Javascript function codes -


Thanksgiving Weekend Crash Course - Android, Sencha Touch, PhoneGap and CouchDB

Happy New Year!


2011 - Year of Rabbit!

Tuesday, November 30, 2010

Thanksgiving Weekend Crash Course - Android, Sencha Touch, PhoneGap and CouchDB

The release of the free Sencha Touch 1.0 gave me the last push to start my own little Android project with PhoneGap and CouchDB all together. I did not have any experience with these three amigos before, it's sure a challenge for me! However, not until the Thanksgiving weekend I finally had time to start the experiment. Following is the screenshot of the result which taken from the Samsung Galaxy Tab and as you can see the CouchDB is on the top status bar!

The main reason I picked CouchDB is because I want the application can be operated offline and can be easily replicated with others servers/clients, I do have over 10 years experience with Lotus Notes, therefore, it won't be too difficult for me to pick up CouchDB since they are all document-based databases.

Following are the resources for this project, all FREE! Thank you open-source communities!
The CouchOne has free CouchDB hosting, I recommend everyone who want to try CouchDb should register one. I use it to create and update databases then replicate to local host and client devices.

The goal of this project was to display the Sencha list view on Android device with user names, user's icons and pop out the game the user paying on facebook if the arrow button pushed. All the users information will be stored on CouchDB and retrieve by JavaScript codes through Ajax.

Since I just wanted to build a very simple CouchDB database the only tool I used was "Futon" which came with the database itself. It is really not a very handy tool since any carriage return will cause an error, I just need to squeeze all codes together. I started with the database named "facebook" and create documents with fields - firstname, lastname and game (array)

To test the attachment function, each document I attached a 48x48 icon (png format) file.

A view named "all" was created under design document "_design/facebook" which was prepared for using under "foo" list.

A list named "foo" was created under design document "_design/acdc", the purpose of this list is to respond  the Ajax call from our main program index.html makeJSONPRequest function. It will respond back as a JavaScript code with all necessary data in JSON format.
 The URL of this list is http://127.0.0.1:5894/facebook/_design/acdc/_list/foo/facebook/all which will be called by our Ajax routine under index.html with a proper callback parameter, on this screen "undefine" is displayed in the beginning since it was just a test dump without assigning callback parameter.
Again! I did all my updates on CouchOne server first, then replicated with the database on my Android devices.

When running the Android application the data retrieving from CouchDB is from localhost(127.0.0.1) port 5894 which deems as the cross domain activity, therefore,  we will need to implement JSONP (JSON Padding) to make our Ajax tasks work. For a detail Sencha JSONP solution you can reference here.  However, the cross-domain security policy does not affect PhoneGap applications. Since the html files are called by webkit with the file:// protocol, the security policy does not apply. You still can use the Schena Ext.Ajax.request to get the same result. For the sample codes of Ajax call you can see here.

After finishing the database part, let's create a new Android project under Eclipse and name it "turkey" -

from the PhoneGap download earlier, find the following two files:
Android/phonegap-0.9.2.jar
Android/phonegap-0.9.2.js

In the root directory of the project you created in Eclipse, create two new directories:
/libs
/assets /www

Now copy
Android/phonegap-0.9.2.jar to /libs
Android/phonegap-0.9.2.js  to /assets/www

add phonegap-0.9.2.jar to build path

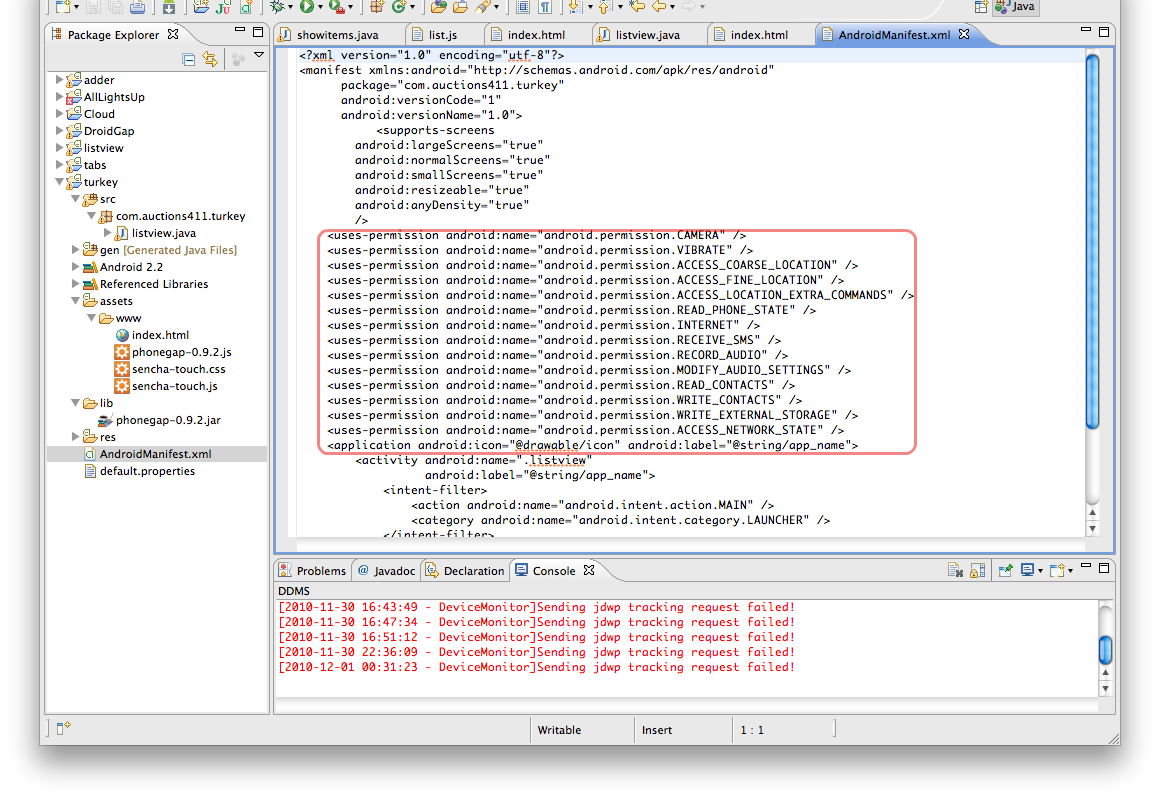
Modify the main java file and AndroidMainifest.xml as specified here.

From the unzipped download Sencha files, copy the sencha-touch-1.0/resource/css/sencha-touch.css and sencha-touch-1.0/sencha-touch.js to 'www" folder, (use sencha-touch-debug-w-comments.js if you need to debug under Sencha codes)

Sencha Touch sample codes have very detail examples, especially the kitchensink example. My goal is to create a nice looking List view, therefore I went for the code under sencha-touch-1.0/examples/list/ folder, to make easy to explain I moved the index.js codes into index.html and did necessary modifications.

Following is the source code of index.html, the function "makeJSONPRequest" is the codes I added to retrieve CouchDB facebook database data.
<!DOCTYPE html>
<html>
<head>
    <meta http-equiv="Content-Type" content="text/html; charset=utf-8"> 
    <title>Turkey Trouble</title>
    <link rel="stylesheet" href="sencha-touch.css" type="text/css">
    <script type="text/javascript" src="sencha-touch.js"></script>

</head>
<body>
<div id='acdc'></div>
   <script type="text/javascript">
var arr=[];
    
function layout(ar) {
  
  Ext.setup({
    tabletStartupScreen: 'tablet_startup.png',
    phoneStartupScreen: 'phone_startup.png',
    icon: 'icon.png',
    glossOnIcon: false,
    onReady : function() {
        Ext.regModel('Contact', {
            fields: ['firstName', 'lastName', 'game', 'id', 'img', 'game']
        });

        var groupingBase = {
            itemTpl: '<div class="contact2">{firstName} {lastName}</div><div><img src="http://127.0.0.1:5984/facebook/{id}/{img}"></div>',
            selModel: {
                mode: 'SINGLE',
                allowDeselect: true
            },
            grouped: true,
            indexBar: true,

            onItemDisclosure: {
                scope: 'test',
                handler: function(record, btn, index) {
                    alert( record.get('firstName') + ' play '+  record.get('game') );
                }
            },

            store: new Ext.data.Store({
                model: 'Contact',
                sorters: 'firstName',

                getGroupString : function(record) {
                    return record.get('firstName')[0];
                },

                data: ar
                            })
        };


        if (!Ext.is.Phone) {
            new Ext.List(Ext.apply(groupingBase, {
                floating: true,
                width: 350,
                height: 370,
                centered: true,
                modal: true,
                hideOnMaskTap: false
            })).show();
        }
        else {
            new Ext.List(Ext.apply(groupingBase, {
                fullscreen: true
            }));
        }
    }
  });
}

    function makeJSONPRequest() {
            
     Ext.util.JSONP.request({
                url: 'http://127.0.0.1:5984/facebook/_design/acdc/_list/foo/facebook/all',
                params: {},
                callbackKey: 'callback',
                callback: function(result) {
                   
                    if (result) {
                        arr = [];
                        for (i=0; i< result.rows.length; i++){
                          arr.push({id: result.rows[i].id, img: result.rows[i].img, game: result.rows[i].game, lastName: result.rows[i].lastName, firstName: result.rows[i].firstName});
                        }
                        layout(arr);                      
                    }
                    else {
                        alert('There was an error retrieving the data.');
                    }

                }
            });
        }
      
  Ext.onReady(function() {
    makeJSONPRequest();
  });
  
    </script>
</body>
</html>

The CouchDB _design/acdc file -
{
   "_id": "_design/acdc",
   "_rev": "47-c4692b5daf6ffa5b74461ea0591c1e5d",
   "language": "javascript",
   "lists": {
       "bar": "function(head, req) { var row; var firstrow=1; start({ 'headers': { 'Content-Type': 'application/javascript'} }); send(req.query.callback+'({\"rows\":['); while(row=getRow()){ if(firstrow==1){firstrow=0;} else {send(',');} send('{\"id\":\"' + row.id + '\",\"firstName\":\"' + row.value.firstName + '\",\"lastName\":\"' + row.value.lastName + '\"}');} send(']});');}",
       "foo": "function(head, req) { var row; var img=''; var game=''; var firstrow=1; start({ 'headers': { 'Content-Type': 'application/javascript'} }); send(req.query.callback+'({\"rows\":['); while(row=getRow()){ if(firstrow==1){firstrow=0;} else {send(',');} if(row.value.game){game=row.value.game[0];} if(row.value._attachments){for (n in row.value._attachments) { img=n;} }  send('{\"id\":\"' + row.id + '\",\"firstName\":\"' + row.value.firstName + '\",\"lastName\":\"' + row.value.lastName + '\",\"game\":\"' + game + '\",\"img\":\"' + img + '\"}');} send(']});');}"
   }
}
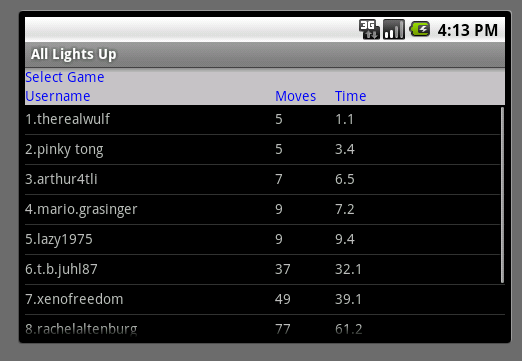
I installed the CouchDB on Mac and used Google Chrome to debug the JavaScript codes first, then ported the code to Eclipse, since I haven't figured out a way to install CouchDB on Android emulator, I had to run the program directly on devices to test. The following screenshot is the program running on EVO 4G -

When click at arrow it shows what game the person play -

Cross Domain Issues on CouchDB and Sencha Touch

Friday, October 15, 2010

WordPress E-Commerce Module PayPal Express Checkout with Coupon Code

WP e-Commerce is a very popular open-source shopping cart plug-in for WordPress, it supports most of the major PayPal payment options include Express Checkout, Web Site Payment STD and Web site payment Pro.

The plug-in supports the coupon discount function as well, however, the shopping cart only sends the total amount after discount to the PayPal, there is no discount coupon and discount price information on the PayPal activities report at all.
In order to let sellers get more information on the transaction involved the promotion coupons , I have modified one of the function - CallShortcutExpressCheckout which under /web-content/plugins/wp-e-commerce/merchants/paypal_certified.php

function CallShortcutExpressCheckout( $paymentAmount, $currencyCodeType, $paymentType, $returnURL, $cancelURL) {
//added $wpc_cart the shopping cart object itself
global $wpdb, $wpsc_cart;
//------------------------------------------------------------------------------------------------------------------------------------
// Construct the parameter string that describes the SetExpressCheckout API call in the shortcut implementation
//exit($cancelURL);
$purchase_log = $wpdb->get_row("SELECT `id`,`billing_region` FROM `".WPSC_TABLE_PURCHASE_LOGS."` WHERE `sessionid`= '".$wpdb->escape($_SESSION['paypalexpresssessionid']) ."' LIMIT 1", ARRAY_A) ;
$usersql = "SELECT `".WPSC_TABLE_SUBMITED_FORM_DATA."`.value, `".WPSC_TABLE_CHECKOUT_FORMS."`.`name`, `".WPSC_TABLE_CHECKOUT_FORMS."`.`unique_name` FROM `".WPSC_TABLE_CHECKOUT_FORMS."` LEFT JOIN `".WPSC_TABLE_SUBMITED_FORM_DATA."` ON `".WPSC_TABLE_CHECKOUT_FORMS."`.id = `".WPSC_TABLE_SUBMITED_FORM_DATA."`.`form_id` WHERE  `".WPSC_TABLE_SUBMITED_FORM_DATA."`.`log_id`=".$purchase_log['id']." ORDER BY `".WPSC_TABLE_CHECKOUT_FORMS."`.`order`";
//exit($usersql);
$userinfo = $wpdb->get_results($usersql, ARRAY_A);
//  print("
".print_r($usersql,true)."
"); // print("
".print_r($userinfo,true)."
"); $nvpstr="&Amt=". $paymentAmount; $nvpstr = $nvpstr . "&PAYMENTACTION=" . $paymentType; $nvpstr = $nvpstr . "&RETURNURL=" . $returnURL; $nvpstr = $nvpstr . "&CANCELURL=" . $cancelURL; $nvpstr = $nvpstr . "&CURRENCYCODE=" . $currencyCodeType; // added following 3 lines to send description to PayPal foreach($wpsc_cart->cart_items as $cart_item){ $nvpstr = $nvpstr . "&DESC=" . $cart_item->product_name . " w COUPON# " . $wpsc_cart->coupons_name . " DISCOUNT $" . "$wpsc_cart->coupons_amount"; } $data = array();

The shopping cart object $wpsc_cart needs to be announced as global, then add the coupon code number and discount total at DESC parameter which will be passed to PayPal API as payment description. The example below shown the applied coupon code and the discount amount on the PayPal transaction report.


For PayPal Web Payment Standard you will need to modify paypal_multiple.php as following
//$data['item_name_'.$i] = "Your Shopping Cart";
$itemdesc = "Discount " . $wpsc_cart->coupons_name . " $" . $wpsc_cart->coupons_amount . " for ";
foreach($wpsc_cart->cart_items as $cart_item){
  $itemdesc = $itemdesc . $cart_item->product_name . " ";
  }
$data['item_name_'.$i] = $itemdesc;

Monday, August 30, 2010

Our First Android Project Is a Game!!

snapshot #1 of All Lights Up in Android Market

snapshot #2 of All Lights Up in Android Market

Friend's son - Jonathan who's still in college wanted to learn some programming during his summer vacation, I gave him a Droid and Android SDK to play around. He never wrote Java before, and now.. after two months hard work, our first Android baby comes to the world! If you have an Android please don't forget to download it and give him some comments, just remember this came from a boy who didn't know how to write program two months ago! The challenges of the project was not only to get to know the UI of Android but to find a good algorithm to help player to solve the game if they click at "Hint" key. 
the opening screen
the menu screen
one of the 5x5 game screenshot
high-scores listing


The game can play on any Android device without internet connection, however, if you want to download more games, or see the high scores or upload your high scores then the internet connection is required. I have managed to implement the service from Google App Engine(GAE), it handles the service calls from the Android devices and keep all upload games and users' uploaded high scores. A web-based administration portal is offered to manage all games contents, upload activities and users preferences, this is done by GAE and Dojo JavaScript library.
activities management page


games management page


Tuesday, July 13, 2010

411Square - Your FourSquare Checkins History Map

FourSquare.com has become one of the fast growing location-based social networking service, its web and mobile application allow registered users to connect with friends and update their location by checking in existing venues, and users can leave tips comments on every check-in to earn badges and mayorships. I am a big fan of Foursquare, I just earned my World Cup 2010 badge couple days ago -

FourSquare offers an API which supports OAuth Authentication and allow developers to retrieve users' check-in history and venues information. Since Google is encouraging developers to upgrade the applications using Google Maps API to upgrade from V2 to V3, I have decided to rewrite my old PHP-based FourSquare History Map application to a GAE-based(Google App Engine) application with the new Google Maps V3 API, and change the authentication method from user id/password to OAuth.

The application is hosted at 411square.appspot.com which requests a Google account to login, since it is used to save users' OAuth credibility -
click at "LOG on" to log in your Google account -
If this is your first time login, the user preferences page will be displayed and you will required to update your profile data before going to get OAuth authentication.

Click at "Update" button and then click at "Get Authorization" link to allow this application to access your Foursquare information.


Once you finish the OAuth process, by clicking at "History" you can see all your check-ins history up to 1000 records (can be changed by the preferences setting). The upper part showing the detail listing of the check-ins history and the data can be sorted by clicking at the header of the table. If you click at the row of the listing you can see the marker information pop-out on the map below.
The lower part is the map showing all the check-ins' venues, you can click at the marker to get more detail and by clicking at the icon you can open the venue page at Foursquare.com.


This application also offers the friends' current locations on map, click at "Friends" link you can see list of your friends' latest check-in venues, a Google Map under will show their Foursquare icons on the locations.

Thursday, May 20, 2010

Top Ten Reasons To Go To Google I/O 2010


1. free Motorola Droid phone

2. and ... another free HTC EVO 4G phone

3. lots of food

4. meet original developers

5. geeks/nerds party (too drunk to take picture)
6. see some big bosses

7. nice city view

8. buy iPad at list price

9. eat, drink, code and play

10. chat with 3rd parties developers at sandbox

Friday, April 30, 2010

ezSHOP - A PayPal Shopping Cart For Your Google Site


On my previous posting, I have demoed using the Google Spreadsheet to manage the PayPal shopping cart on Google Site. However, the back-end server was an Amazon EC-based PHP agent. Now I have ported the server to Google App Engine which users can just use their Google authentication  login to finish the setup without giving away their passwords.

To begin the store setup you need to prepare your items on the Google Spreadsheet, you can see the example spreadsheet here. Make sure your spreadsheet has the same headers (case sensitive), the sku, title, price, picture url fields are required, all others are optional.

To start the set up go to  ezshop411.appspot.com

You need to have a Google account (Gmail or Google Apps account) to start. Once you login, you will be bringing to the User Preference page. Your nick name will be your Google account id and the email will be your Google Email. The following two fields asking for an additional Google account which should have minimum READ access right for the spreadsheet you gonna use for the store. You can enter the same account information as your original one, however, for the security, we recommend use different Google account.
Once all information filled out, click at the Update button to save them. Now click at "Main" button you start the build-up. The main page already load all your Google Spreadsheet files' name from your site for you to choose to generate the token to create the PayPal store.
user preference settings


Once you decide which file to use just click at "Add" button to create one store Gadget list. It will show you the time it was created and the store Gadget URL which you will need to use it when add the store gadget to your Google Site. You can also remove the listing by clicking at "Delete" button. The deleting will not delete your spreadsheet on your Google Doc, however, if you have any Gadget using this token to access the store information will stop to function. If you click at the name of the list it will show you the spreadsheet in CSV format, you can use the feature to double check if you choose the right file.

Now, open the Google Site, select the site you want to add the ezSHOP store, choose the PAGE you want to add the store Gadget, click at "Edit page" button. Once you are in EDIT mode, go to the section where you want to add the Gadget, then click at "Insert" button, choose "More gadgets"

A new window will pop out -

Click at "Add gadget by URL" on the left-hand side.

Type in the URL which you copy from your main page's Gadget URL then click at "Add" button.

A Gadget setup screen will be displayed as above. Gave the Gadget the proper width and height, make sure you check the "include a scroll-bar on gadget when necessary". Click "OK" to finish setup.
You can always come back to edit the Gadget setting by clicking at "Properties" of the Gadget.
Once you save the PAGE from EDIT mode, you should be able to see the store items listing right away. The current released version only supports PayPal "Buy Now" button. I will add the PayPal shopping cart function for the next release. Once customer click at "Buy Now" button, a PayPal payment page will show up and customer can fill up the information to complete the transaction!
There are some other issues like shipping charge, sales tax, inventory control... etc. You will need to go to your PayPal account page to  set up correctly. Some of the functions can be done programmatically through PayPal API, we will discuss these more details in the future releases.

Above is the sample spreadsheet we used to do the demo, you can download it and upload it to your Google Doc to test this ezSHOP Gadget.


********************************************************
NOTE:
This Gadget only works under HTTP not HTTPS since there is PayPal service url link within the HTML codes, unfortunately, now Google Sites default URL only allows HTTPS, like https://sites.google.com/a/.... therefore, you have to map your own domain host name to the Google SITES to use HTTP, for example, create a host named "store" under your Domain, so http://store.yourdomain.com will be your url. To map your domain host to Google Sites just go to "Manage Site" and choose "Map this site" button to proceed. Only done, you can see the Gadget under you own domain url page.